Sunday, January 26, 2014

Pink Lily.....


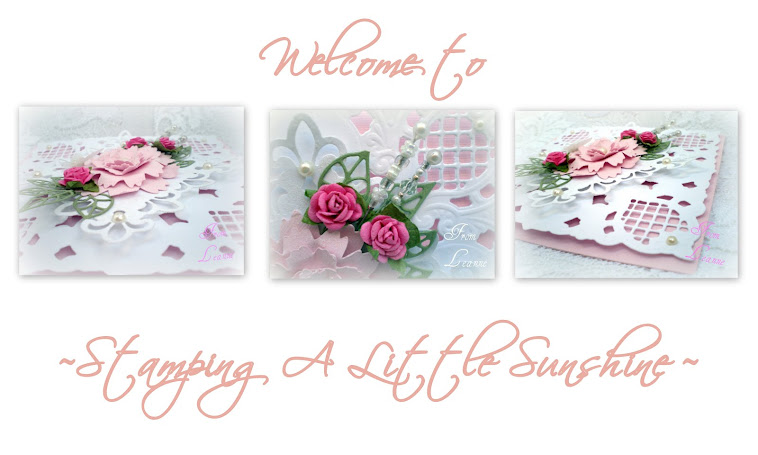
I did another try at making a Lily for my card.  I love this die cut I purchased at a stamp show last year.  The die cut is from Susan's Garden #658275.  I made another similar looking Lily for a different  card last year and posted it to my blog,  but you may notice the Lilies are a tad bit different.  You can peek at last years Lily here and compare their differences and similarities.  


I used two of my favorite die cuts for the background and mirrored them together.  The two die cuts are:
Spellbinders Nestabilities Decorative Labels Eight (white in color) and Ellentina Cutting Dies Classic Collection.(black in color).


Last time I used the Ellentina Cutting Dies many of you emailed to ask me where they could buy it on the Internet. (Please save yourself time and try to refrain from emailing me to ask me where I purchased mine because.... here is my secret.........I purchased mine at my last stamp show I attended last year in Orlando, Fl. and I know from past experience it is very hard finding this die cut elsewhere.  Here is a little hint on where you might be able to purchase the Ellentina Die Cut from?  Tessler Stamp.com.  Click Tessler Stamp Co. and it should take you to their website.   Hope this helps?


I'm hoping your not experiencing bad weather where ever you may be at this time?  If so, I'm sure your counting down the days till spring.  Spring is always such a favorite time of the year for me.  


Sunday, January 19, 2014

Covered Tissue Box...


Here is my next little projects for you today.  I have a good friend (Cecilia) who had an accident and needed nose surgery to correct her problem.  So what could be better after surgery to help her along  than a pretty little box of Kleenex (just in case)?


I saw this done elsewhere (on Pinterest somewhere) and thought what a cute gift idea to give someone when they are sick or have a bad cold.  I got busy and began to use my swirl stamps and used my blue embossing powder from Sparkle N Sprinkle along  with light blue paper.  Covering the box from the original packaging, I used pretty flowers, leaves, pearls and covered it all for a new look and presentation. 


I had already sent Cecelia a card in the mail to wish her get well right after surgery but wanted another little card to give with the box to match when visiting with her.  I then stamped this cute little verse inside of it and signed it and gave it to her.  She thought it was precious!


I have added a few directions here in case it inspires you to make your own sometime?

Directions For Box:


Step One:
Chose a Kleenex box of your choice.


Step Two:
Measure top of box and sides to the size you want to cover and cut according to your measurements.  Cut the paper you selected as your base color and remove the center of the Kleenex from your box.  Trace the Kleenex center onto your selected paper.  In this case the ends were absent so I made my own tracing with my Spellbinders Ovals to help me cut the perfect shape. 

Step Three:
Now take a Xacto knife and cut the center of your paper you traced.


Step Four:
You will need the top and two long side and two short sides.


Step Five:
I took each paper and embossed them.


Step Five:
I decided I wanted a silver background for each of my papers. I then cut and embossed and glued them onto each piece of blue paper.  Adding a silver background to my paper adds a little more of a finished touch to the box.


Step Six:
I also had to use the Xacto knife to cut out the backgrounds silver lining.  I then glued each paper on to the box.


Step Seven:
Now after all sides are covered begin adding all your flowers and decorations to your own liking.


I hope these directions helped you?  Let me know if you make a box?
 I would love hearing from you.
Thanks for stopping!

Monday, January 13, 2014

Coasters and Napkins...

Today I would love to share with you a Christmas gift I gave my daughter and son-in-law for Christmas. No pretty card to share with you today.
I made them their very own set of homemade ceramic coasters from titles I bought at Home Depot and also made some monogrammed white and black napkins to match.


I should of taken better pictures to share with you all.  Since I didn't... these few pictures I took will have to do?  I used my "En Francis" stamp from Stampin Up and cut a circle with my circle punch and stuck it to the middle of the title so I could later add their last name initial "R" to the center.  I then removed the scrap circle paper and used my Martha Stewart Initial stamp and stamped it in the middle.  My daughter was pleasantly surprised when she opened the gift bag with both items.  She loves homemade love from Mom.  LOL!  If your interested in making some you can download directions from the internet on what to buy and how to do this.  It really was quite simple.  Here is a link for you that my help you with some directions. 


  The real trick to this is to be sure to spray Acrylic Matte Spray Finish to the titles after the Stazon Ink has dried.  If not the ink will not adhere to the ceramic title and will come off or run.  In case your wondering what to spray them with I used Art Deco Acrylic Matte Finsih DAS13 from Michael's Arts and Crafts.  I also bought cork by the sheet at Michaels Arts and Crafts and made small circular dots and glued it onto the backside of each corner of the title so it would not scratch their furniture.


Now for the napkins....I purchased some white plain paper napkins and then used my initial stamp with black Stazon ink.  I want to be sure to tell you to put a plain piece of white scrap paper in between the first layer when you stamp so that the ink does not bleed onto the other folds of the napkin. 


Showing you the scrap paper between each fold here.


Here was the Martha Stewart stamp I used with black Stazon ink for both the tile and napkins. 


I didn't take a picture of how I put each napkin back into the original cello wrapper and put a pretty blue ribbon to wrap them to match the coasters ribbon.   It really made a nice matching personalized set to give as a nice little gift. 


I hope this may inspire you to do this for a nice gift for a friend, family member or loved one at a later time?

Thanks for stopping and please come back soon!  I always enjoy your visit.


Monday, January 6, 2014

Reviewing My "2013" Favorites....

 
As we begin a New Year I would like to say Thank You to each of my followers and let you know how grateful I've been to those of you who have been so sweet to leave me personal messages on my blog each week.  It means a lot to me.  I wish you loads of love, good health and prosperity in the coming New Year.
 
But first it's time to recap some of my personal favorites I made in "2013".  For those of you who may recall seeing them, I hope you enjoy a recap seeing them again?  For those who may have missed them  last year, here is a quick glance of "2013" for you.   
 
 I hope in "2014" I don't bore you by using some of my same old die cuts over again.  As one of my New Year's resolutions I vow to try and  reuse what I have rather than buy more die cuts etc. (Not to say I won't buy a few, just not as many as I would love).  Each stamper knows how expensive the hobby is and I hope to recreate rather than spend, spend, spend!  I think my hubby would be very happy of my New Year's resolution? {{{smiling}}}!
 
 Now for last years line up!


Thanks for stopping and may you enjoy stamping as much as I do in 2014.


Don't Forget To Leave A Comment...

Related Posts Plugin for WordPress, Blogger...