Monday, December 31, 2012

A Blue Christmas...

 
First I'd like to wish you all a Happy and Prosperous New Year in 2013.


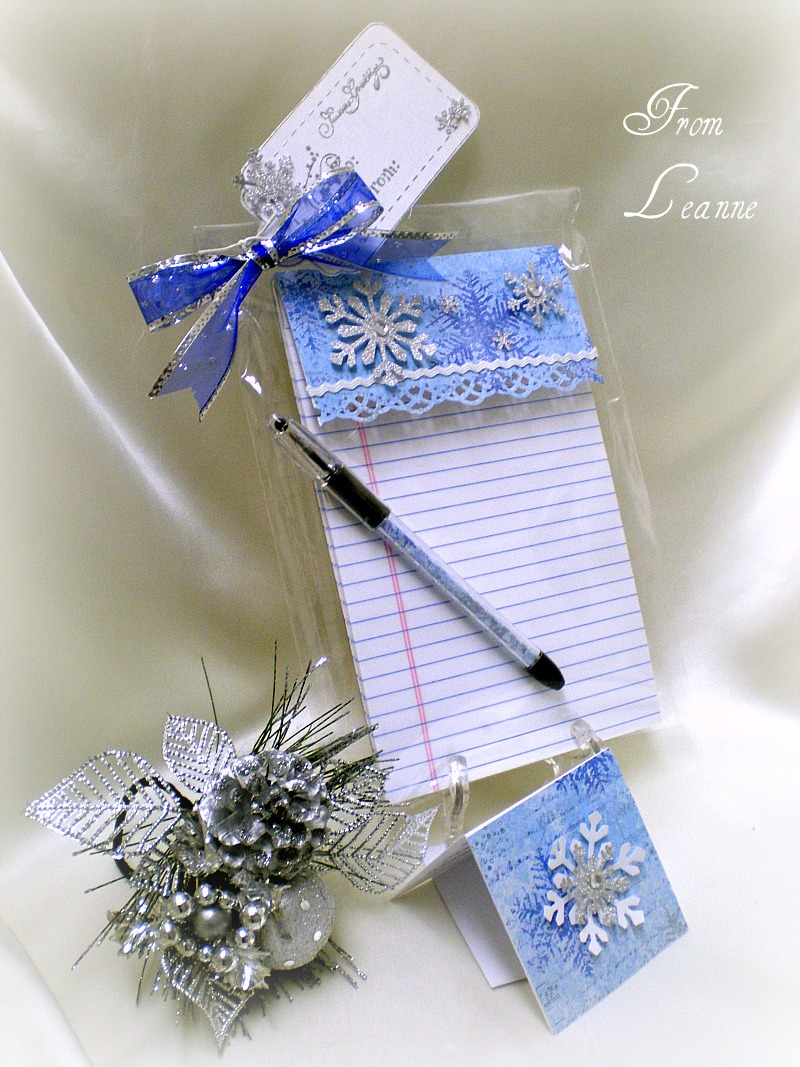
I enjoy giving a little hand made gift now and then.  Especially when I find an idea that others are so gracious to post on Pintrest or their blogs.  I've posted something similar before and posted it to my blog in a different design. I made two of these for gifts to give to two of my favorite neighbors for a little gift this holdiay season.  Since I'm not much into baking and giving out Christmas cookies like others,  this is my way of showing my love for them at Christmas.


I made this small and simple card to match. I stamped a Merry Christmas inside.  It is only 3 1/2 x 3 1/2 inches.  I had some small envelopes that size and attached it to the cello bag with the blue bow. 

 
Here is a close up of the top of the pad.  I used sparkle silver paper and added little sliver rhinestones to the center of the two large snowflakes.  I attached a tag and left it blank so they would be able to use it later, if they wished.  Each of my neighbors loved this gift.  They thought it was so cute.  I thought by making it in blue they would not mind having it around during the year other than Christmas.
 
I hope you holidays have been memorable? 
 
May your New Year in 2013 be filled with blessings.
Leanne


Sunday, December 23, 2012

Dinner Place Cards and Matching Christmas Card...


My dad has the most sweetest girlfriend  Gerri who is 80's young (I won't give her real age away here).   Each Christmas I try to come up with a little gift idea that I can make and give to her.  This year I came up with the idea of place card settings for her dinner table.  Since she loves to entertain formally she usually has place cards set at her dinner table so each guest knows where to sit.  One evening I though  of this idea to make and give her some of my own  homemade place cards.  She usually has a large group of people each time she entertains for dinner. I've been invited to quite a few of her lovely delicious dinner parties.  So I wanted to make her at least 12 place cards to match with a Christmas table theme.
 
 
I used my snowflake punch and made 6 in green and 6 in red to break them up a bit and blend in with Christmas colors that she would set her table with.
 
 
My next problem was now....how do I wrap them?  I had purchased some clear cello box's last year while attending a scrapbook show.  They finally came in handy.  It was still a little hard to place them inside the box and arrange them in a way to look evenly balanced inside.  That's why it may look a little strange when viewing this picture?  I inner-connected and some are upside down etc.
 
 
I was lazy and didn't make a tag to match.  Perhaps I should have?  Instead I down loaded this pretty little Christmas gift tag from a talented women Astrid who lets you print freebies from her website.  I took advantage of her efforts.   Sincere appreciation to Astrid. 
 
 
I hope Gerri enjoys these little place cards?  And...I hope you're enjoying your Christmas holidays!
 
Merry Christmas friends....!!!


Monday, December 17, 2012

Poinsettia Card...

 
Earlier this year I attended a Stamp Show and ran across a both that demonstrated burnishing micro fine glitter and using stickers. However for the life of me I do not remember the name of the booth or company to give credit to?  I fell in love with the fine glitter technique and is really quite simple to do. Just a tad messy with glitter everyhwere if your not careful?  I watched how the women demonstrated the technique and decide it would be so nice on a  Christmas card or two of my own.

 
If you take a careful look you will notice both of these cards are done a little different.  With my first card (above) I burnished the bottom of the card in green micro fine glitter and also embossed it with with my Stampin' Up embossing folder called Petals to both the top and bottom.   In the second card I just did the card in a green Bazzill paper and added some silver stickers that I had on hand to each corner.  I love the special silver paper I also purchase at the show and embossed it.  It gives it such a clear crisp look.
 
 
Here is a close up of the poinsettia sticker and micro-fine iridescent glitter for the background. I think I need photo classes to catch the fine glitter here because my picture does not do justice to this glam. 
 
Wishing you all a swinging  Merry Christams....Leanne 
 

Monday, December 10, 2012

Happy Holidays...

 
Usually in June or July I begin to think about my Christmas cards that I will make to send out to each of our out of town friends and family.  I usually make between 30-35 cards. So I begin the arduous task early in the year so that I'm not rushed.  I try to make them simple and without to much dimension them so that I will not have to pay extra postage.  Half way through making them I say to myself; "this may be my last year to make my own Christmas cards to send to everyone"? 
 

 This was what I came up with for this year and have finally mailed them out so it's now safe to post them for you.  I used vellum paper to embossed the ornaments and then took a small amount of silver paper to emboss a ornament and cut it out for each card and placed it on top of the middle ornament with a glue dot.  I added a silver bow I made for each card and also used three tiny sliver snowflakes and attached it to the card.

 
This was the Christmas verse I chose to put on the inside of each card.  I generally prefer Merry Christmas to the front of my cards each year.  However, I did not have a stamp small enough to fit the space on the front of my card.  So I used Happy Holidays in red ink instead this year.
 
 Wishing you a blessed Christmas Seaon!


Sunday, December 2, 2012

Let It Snow, Let It Snow, Let It Snow...

 
I had a special request from a dear friend that asked me if I could make a special Christmas card for each of her three children so she could give them to them this holiday season.  I said;  "how about snowflakes on it"?  She agreed and here is the final outcome.  She was pleased when I gave them to her.  Once again it's so difficult to photograph all white cards.

 
I was able to type a very nice Christmas verse in the inside of each card and printed their name on each card to personalize it.

 
I started out with my Cuttlebug Embossing folder and stamped the background with pretty little snowflakes on it.  I managed to also use my double sided Sookwang tape and Glitter Ritz Micro Fine Glitter (to burnish it) and glam it up a bit on the bottom and then stamp Merry Christmas on it. 
 
I used 2 different sized Martha Stewart snowflakes and my Marianne Designs Die Cut (shaped like a huge snowflake). I also used a very tiny little snowflake punch from Michael's Arts and Craft store from their $1 bin and stamped them in silver glitter paper to set off the white snow flakes and to add more glitter to the card.  I also dabbed a tiny amount of Stickles Iridescent Crystal color all around each snowflake to make it look as if each snowflake was glistening in the sunlight. 

 
I hope these pictures give you the general idea here? 
 
May you all get working and stamping like Santa's little elves and soon
share a crafty little Christmas with your family and friends.
 

Don't Forget To Leave A Comment...

Related Posts Plugin for WordPress, Blogger...